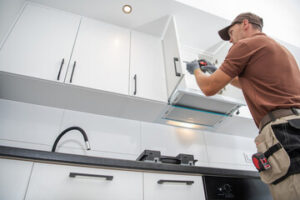
Erie Roofing is one of the most important components of a building. It shields a home or business from harsh weather conditions and also contributes to its energy efficiency and aesthetic appeal.
It can be made from a variety of materials. Choosing the best roof depends on cost, maintenance needs and expected lifespans.
Plywood is a popular choice for roof sheathing, as it resists moisture and can withstand heavy loads. It is also cheaper than unnatural roofing materials, making it a cost-effective option for homeowners. However, there are several varieties of plywood available, and it’s important to choose the right one for your roof construction project.
Choosing the proper thickness for your roof’s plywood sheathing is essential, as different types of plywood can handle varying weights and weather conditions. The most common thicknesses for roofing are 3/8” and 3/4”. While thinner plywood is suitable for lighter roofs, thicker plywood is better suited for heavy snow loads.
In addition to thickness, you should consider the type of plywood core that will be used. The most common types of plywood are core, veneer core, and medium-density fiberboard (MDF). Core plywood is a more durable material, while veneer plywood has a smooth surface and can be used for decorative projects. Whether you’re using MDF or veneer, it’s important to check the plywood for warping and damage before installation.
Plywood boards are constructed from thin layers of wood glued together, and they can withstand extreme temperatures and weather conditions. This makes them a durable option for your roof’s sheathing, as they are less likely to swell or shrink over time. Plywood is also more affordable than other unnatural roofing materials, and it’s easier to install.
There are many benefits to choosing the right plywood for your home. In addition to being able to withstand heavy loads and extreme weather, it can also increase energy efficiency and provide safety in the event of a fire. However, it’s important to consult with a professional to determine if plywood is suitable for your specific home.
When it comes to plywood, there are many different types to choose from. Each variety has its own unique qualities, but all are great options for your next home project. For instance, ApplePly is a premium hardwood plywood known for its strength and stability. It is ideal for cabinetry and architectural millwork, and it’s a favorite among discerning woodworkers. Alternatively, you can opt for aircraft plywood, which is designed to meet stringent aerospace industry standards. This plywood strikes a perfect balance between strength and weight, and it’s an excellent choice for aviation and aerospace applications.
Asphalt shingles
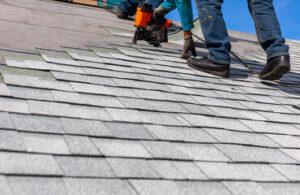
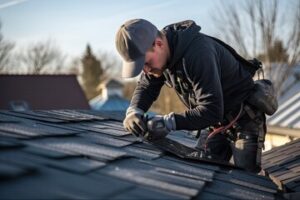
Asphalt shingles are the most common roofing materials used to protect American homes. They are affordable, durable, and come in a variety of styles and colors. In addition to these benefits, they offer a number of energy-saving advantages. This makes them a great choice for homeowners looking for an efficient, customizable roofing option.
The first step to installing asphalt shingles is to prepare the roof. This includes repairing any existing damage, removing the old roof layers, and cleaning the surface to ensure a clean, smooth installation. Once the roof is ready, a base layer of underlayment is laid and the shingles are installed in rows. The shingles are fastened to the underlayment with nails or staples and are overlapped to create a watertight seal.
There are three different types of asphalt shingles: three-tab, dimensional, and architectural. Three-tab shingles are the most basic type of shingle and are the least expensive. They have a single layer with cut-outs forming three tabs and have a repetitive pattern that gives the roof a three-dimensional appearance. They are a good choice for homeowners who are looking to save money or in areas with mild weather.
Dimensional shingles have two or more layers of shingle material fused together and offer a richer, more varied visual appearance than three-tab shingles. They are also more durable than three-tab shingles and are available in a wide range of color options.
Finally, architectural shingles are the most popular type of asphalt shingle and are designed to replicate the look of traditional wood shake or slate tile roofs. They are crafted to be more durable than dimensional shingles and feature an enhanced fire resistance rating.
The process of making an asphalt shingle starts with a fiberglass mat that is either organic (cellulose fibers) or inorganic (glass fibers). The mat is saturated and coated with asphalt before being covered with ceramic-coated opaque mineral granules. The granules provide the shingle’s color and help it resist sun exposure and fire. In addition, some shingles are coated with reflective granules to reduce the amount of heat that is absorbed by the roof.
Metal
Metal roofing has become a popular alternative to other materials, such as asphalt shingles and wood shakes. It is lightweight, durable and energy efficient. Additionally, it is able to withstand severe weather conditions such as high winds and hail. Many types of metal can be used for roofing, including steel, aluminum, and galvanized iron. In addition, these metals can be used in a variety of shapes and sizes to suit any style or budget.
Corrugated metal is a classic design with a long history of use around the world. It features a series of wavy ribs that repeat and are spaced close together, creating a light texture for roofing and siding. These ribs add strength and durability to the roofing material. It is available in a wide range of colors and can be finished with a number of coatings. Corrugated metal is easy to install and offers a great return on investment for homeowners.
Steel is one of the most popular metals for roofs because it is strong, durable and inexpensive. It also provides some insulation, making it a good choice for colder climates. The most common type of steel for roofing is galvanized, which has a zinc layer that helps extend its lifespan and protect it from corrosion. Steel can be finished in a variety of ways, including stone-coated and galvanized tile.
Another popular option is aluminum, which can be used in a variety of different finishes. It is also resistant to corrosion and dents. It is not as strong as steel, but it is a good choice for coastal areas or areas with high rain or snowfall. Aluminum can be finished with a paint or left bare to oxidize for a natural, rust-resistant look.
Other types of metal roofing are fabricated on site and require welding and soldering. Some of these include standing seam, modular, and shingle-style panels. The type of metal, local labor rates and roof complexity all affect cost. For example, standing seam metal requires more skills to fabricate than shingle panels. In addition, there are different standards for roofing materials, depending on the environment. For example, stainless steel is often preferred for roofing in areas prone to harsh weather conditions such as hail or wildfires.
Clay tiles
Clay tiles are made from natural, recyclable materials and offer a unique aesthetic to homes. They add a touch of charm and increase the overall value of a property. Although they are more expensive than other roofing options, their long lifespan and durability make them a worthwhile investment.
Clay tile roofs require minimal maintenance compared to other roofing types. They don’t rot or experience mildew, and they’re easy to clean with regular professional cleanings. However, they are susceptible to damage from high winds and should be inspected regularly for cracks and chips.
When installing clay tiles, a protective underlayment is critical to prevent water and moisture from seeping through the roof. Tiny caps or round cap nails can securely fasten the underlayment in areas prone to heavy winds. Alternative durable waterproofing systems, such as mineral surface roll roofing or self-adhering bituminous membranes, should be considered in regions with harsh wind conditions or on shallower slopes.
One disadvantage of clay tiles is that they are relatively heavy and must be backed by strong roof framing. It is important to consult an expert before deciding to install this type of roofing.
A clay tile roof can be a great option for homeowners who are interested in saving money on energy bills. Unlike most other roof types, clay tiles are resistant to heat and take a long time to heat up, which helps regulate the temperature inside your home.
Another advantage of clay tiles is that they can withstand high-speed winds. However, they may shift or become dislodged if the roof is not properly designed. To ensure that your clay tile roof is built to last, it is a good idea to have it inspected regularly for any signs of damage or shifting.
Both clay and concrete roofs are an eco-friendly choice for home owners who are concerned with environmental issues. Both materials are recyclable and have an extended lifespan when installed correctly. They are also class A fire-rated and will protect your home from external damages. However, they should not be used in areas with freezing temperatures because they can be damaged by freeze-thaw cycles.